WHAT TO READ THIS WEEK
18 Must-Try Dumplings from Around the World - The Ultimate Guide
Making sourdough bread at home is one of the most rewarding baking pursuits that you can embark on. The entire process from building a starter to baking your first loaf can seem intimidating, but I am here to share my basic sourdough bread guide to demystify the process.
Long before I fell in love with cooking, baking & food nutrition, sourdough was always my favorite kind of bread. Sourdough not only tastes amazing but wild yeast actually transforms flour into a healthy and nutritious source of sustenance. If you are just embarking on baking sourdough, be prepared to fall in love. There is something so deeply satisfying about baking sourdough bread. From watching the incredible process of wild yeast fermentation to shaping & scoring your loaves, making sourdough is a beautiful gesture of love & dedication.
I may have titled this guide as “basic” but the resulting loaf of sourdough bread that you will achieve is anything but basic. The specific flour combinations and techniques that I teach you in this post & recipe will yield an incredible loaf of sourdough whether you are a beginner or more advanced sourdough baker. I developed this basic sourdough bread recipe to have every characteristic that makes for a very well balanced loaf of sourdough; even tender crumb, crisp crust that is not too thick and of course, great flavor. It is my sincerest hope that in sharing my sourdough process that more and more people will embark on the sourdough journey because once you fall in love, it becomes a beautiful part of your life.

Because we are only essentially using three ingredients, every single ingredient counts when it comes to sourdough. The better quality ingredients you use will equate to better tasting sourdough, it’s as simple as that. Here is a brief breakdown of how to choose your ingredients for sourdough baking.
I have made many different batches of sourdough and have settled on a combination of the following flours:
WHY RYE FLOUR IS SO GREAT FOR SOURDOUGH:
Contrary to popular belief that the yeast in sourdough comes from the air, the primary initial source of sourdough microflora is actually from the flour. Yeast and bacteria live on the outside of the grain (just like the yeast to make wine lives on the skin of the grapes). Whole-grain rye flour is so great for sourdough because it has a high level of enzymes that attract a variety of yeasts.
Make sure to only use filtered water for your sourdough starter & loaves. Your sourdough starter and the naturally leavened loaves you make with it contain wild yeast and lactobacillus bacteria which work much more slowly than commercial yeast. Any chemical compounds that are present in tap water can produce undesirable reactions in your starter & dough, so using only filtered water is the best for sourdough.
Because the salt is incorporated into the dough after it has started developing structure, using a fine grain salt is very important. Sea salt is my first choice because it is unprocessed and contains minerals like magnesium which acts as a growth stimulant for yeasts. It also contains sulfates that stabilize proteins and help strengthen dough structure. For all of these reasons & more, fine grain Celtic sea salt is my salt of choice.
Because sourdough is really only a combination of three essential ingredients, the actual process of making sourdough bread really boils down to technique. As you follow along with my guide, you will find that I use some techniques that you may not have seen done in other sourdough guides. And it is these very techniques that you may find yourself questioning that will actually make the biggest difference in your sourdough baking adventures!
Building a starter is the first step to starting your sourdough journey. Use my Basic Sourdough Starter Guide to build a really viable, strong starter in less than a week with only 5 minutes of active time per day.
Once you build your starter, you will store it in the refrigerator, removing it to feed a minimum of once a week to keep your starter nice and strong. I refresh my starter the night before I plan on starting my sourdough loaves. I like to maintain a very small amount of starter to reduce discard waste.
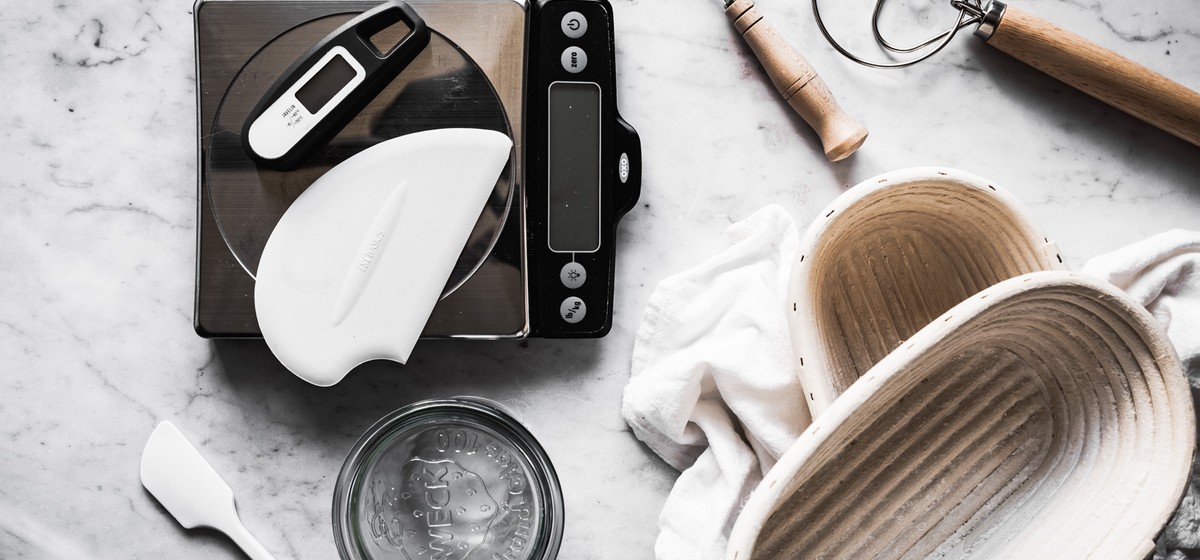
The following is a complete list of every tool that I use to make sourdough at home. I cover the purpose that each tool serves and why I find each one integral to my sourdough baking process.
Now that we have covered all of the sourdough tools in my arsenal, we are ready to dive into the sourdough bread baking process! I have broken down the process into steps with a time schedule and technique videos to help you visualize the methods used to create beautiful sourdough loaves.
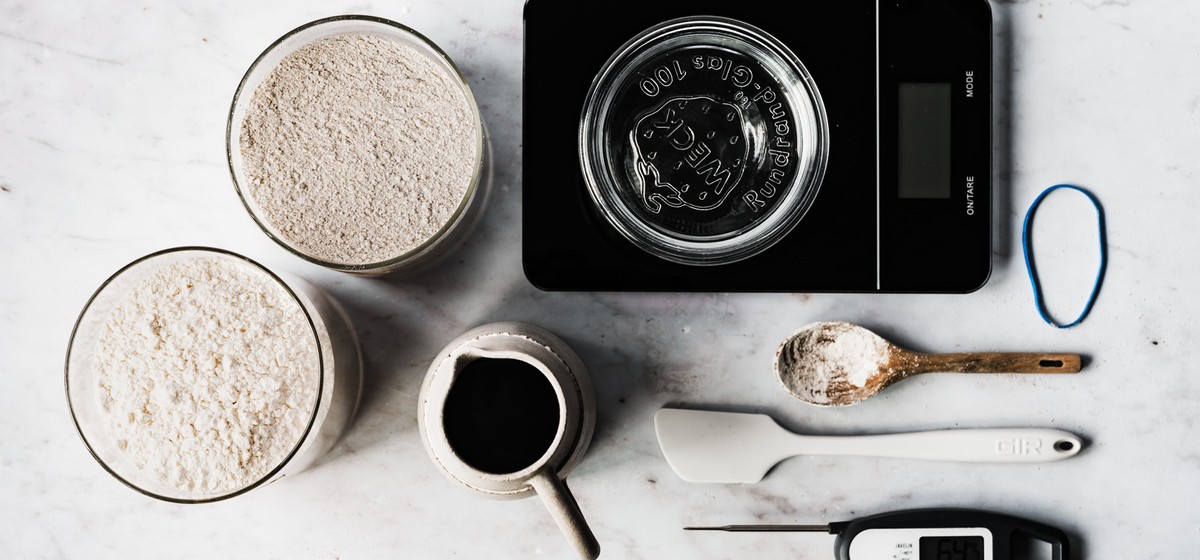
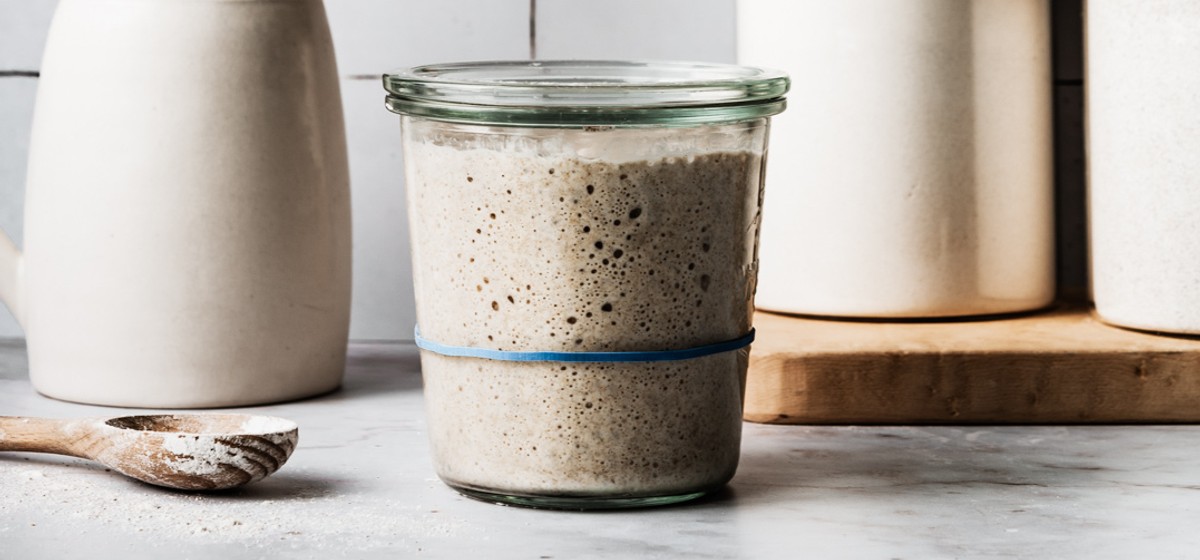
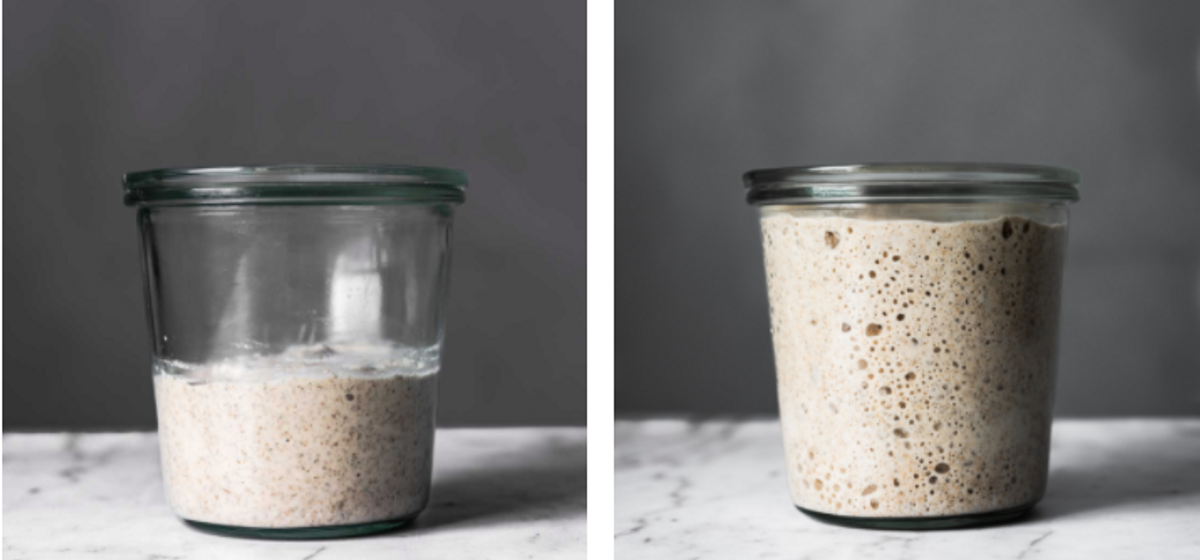
The night before you are going to make your sourdough remove all but 25g of starter from your jar. Add in 50g warm water & dissolve starter into the water by stirring with a small silicone spatula. Add in bread flour & rye flour, thoroughly combine dry flour into the liquid with your spatula until mixture is very smooth (wiping sides of the jar to keep the exposed glass as clean as possible)
Set your jar in a warm environment to rise overnight. Your starter should have grown three to four times its original amount in 8-10 hours. Visually, your starter reached its peak and slightly fell from that point, which means your starter is now refreshed and is ready to bake with! To test your starter’s strength, perform a float test by scooping a small amount into a small bowl of water. If your starter floats it is ready to use!
Leaven is a starter, flour & water mixture that incorporates a small portion of your refreshed sourdough starter; leaven is the foundation that will ferment your sourdough loaves. We leave the leaven covered to rise in a warm environment for a total of 5 hours.
Autolyse is a technique that delivers a dough that’s easier to work with and shape, and a loaf with better texture, rise and flavor. Our flour and water get mixed until no dry flour remains and then covered & left it in a warm place for 3 hours. During this time, gluten development begins and the simple sugars start to form as starch is broken down. I have found that allowing the dough to sit for a 3 hour autolyse yields a very smooth and elastic dough.
By now your leaven is ready and autolyse of the dough is complete. Add the leaven to the top of the dough and use your wetted hand to fold & squish the leaven into the dough, until the two have become one. Once well combined, we cover & let the dough rest in a warm place for 20 minutes.
We add the salt later in the sourdough process to allow time for enzymatic processes, gluten development, and yeast activity to happen before the salt inhibits them. Simply sprinkle the salt over the dough & use your wetted hand to fold & squish the salt into the dough. Once the salt is starting to mix into the dough (about 1 minute later), you will use the Rubaud Method to mix the dough for 4 minutes (I recommend mixing for 2 minutes, taking a short rest, and then mixing for another 2 minutes). The Rubaud Method of hand-mixing was developed by Gerard Rubaud. It can be described as a scoop, lift and slap method that mimics the action of a diving arm mixer. With each slap, you are incorporating air and building a very extensible dough; this is, by far, the best hand mixing technique that I have used. Once done mixing, we cover & begin bulk fermentation.
Bulk fermentation is the first proof of our sourdough. It is called bulk fermentation because you are letting the entire batch of dough ferment as one mass, before dividing and shaping it into loaves. At specifically timed intervals throughout bulk fermentation, we are going to perform coil folds to strengthen and develop gluten in the dough. While many sourdough recipes use the “stretch and fold” method, I greatly prefer coil folding. I feel that coil folding works with gravity in a way that really benefits the structure of the dough. As you watch me perform each st of coil folds, you will be able to see the dough strengthen more each time.
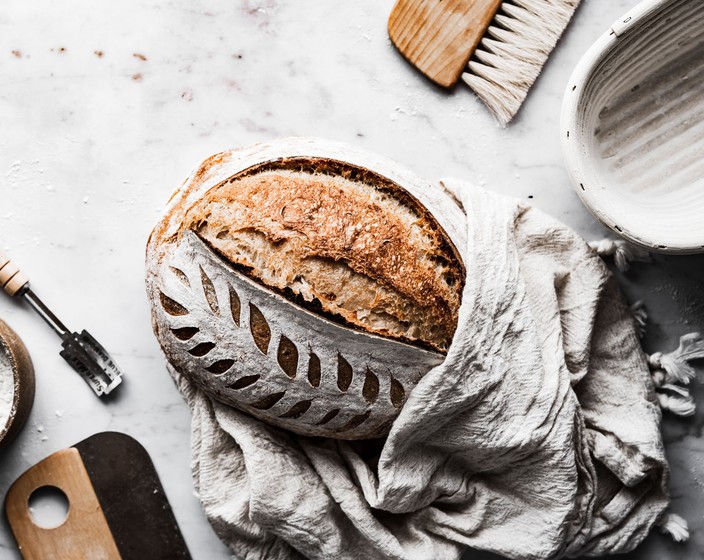
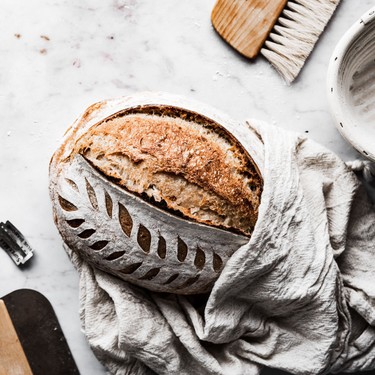
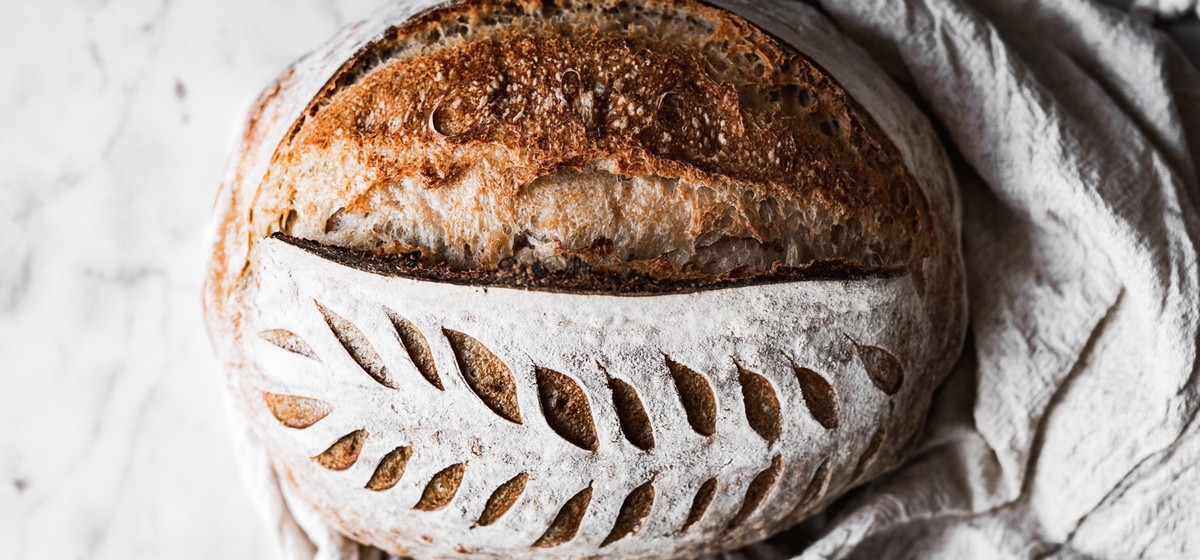
If your dough is fermenting at 78°F, bulk fermentation should be complete in about 4.5 to 5 hours. You will know when to end bulk fermentation when the dough has increased strength, elasticity, smoothness, volume gain, and a bubbly appearance. When you gently shake the bowl, the dough mass will jiggle letting you know that the dough is nice and lively. We then divide the dough, perform a pre-shape, then our final shaping and finally prep the loaves to cold retard in the refrigerator overnight. I have tried various shaping methods and the diagonal/corner fold method I show here in my guide is my favorite shaping method. I also believe that it is the most beginner-friendly shaping method there is.
Today is bake day! You have some flexibility as to what time you start baking your loaves. I like to pre-eat my oven for 1 hour at 500°F with my dutch oven set on the center rack when I first wake up. After an hour of heating at 500°F, remove one banneton from the refrigerator, turn the loaf out of the banneton onto a piece of trimmed parchment paper, slash & score as desired and place the loaf into your pre-heated dutch oven. Cover & bake for 18 minutes before removing your dutch oven from the oven and transferring the loaf by its parchment paper to a baking sheet. I remove the loaf from the dutch oven to finish baking on a sheet pan in order to ensure that the bottom crust will not be too hard or over baked. If you want a nice even crust all the way around, trust me and do the second half of baking on a baking sheet!
Continue baking the loaf for 22 minutes at 400°F for a golden colored crust or 20 minutes at 425°F for a darker colored crust. The internal temperature of the loaf should read 210°F when it is done baking. When done baking, move loaf onto a cooling rack and allow to cool to room temperature.
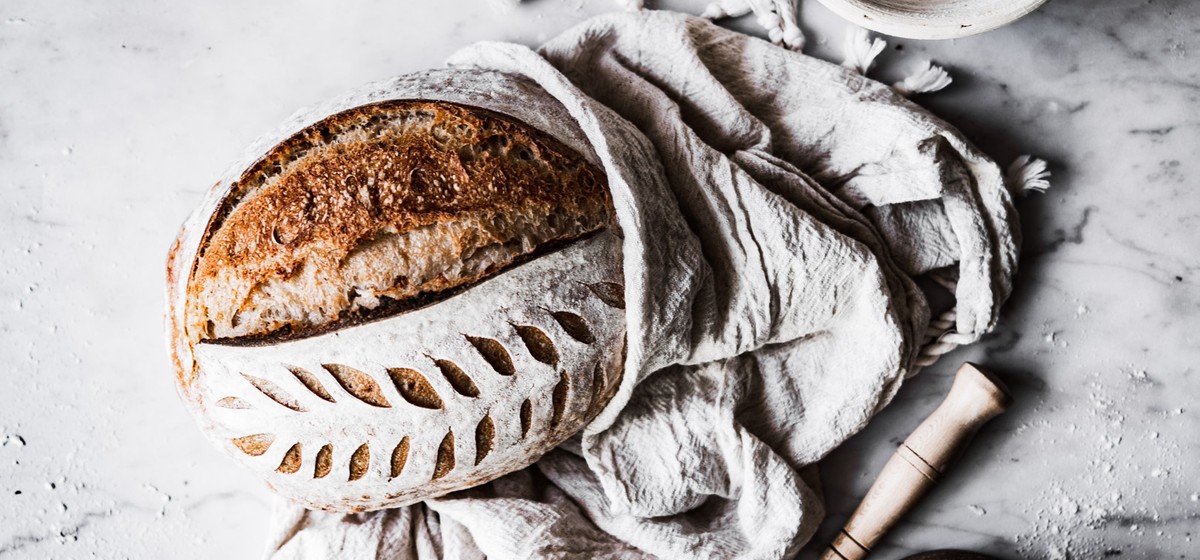
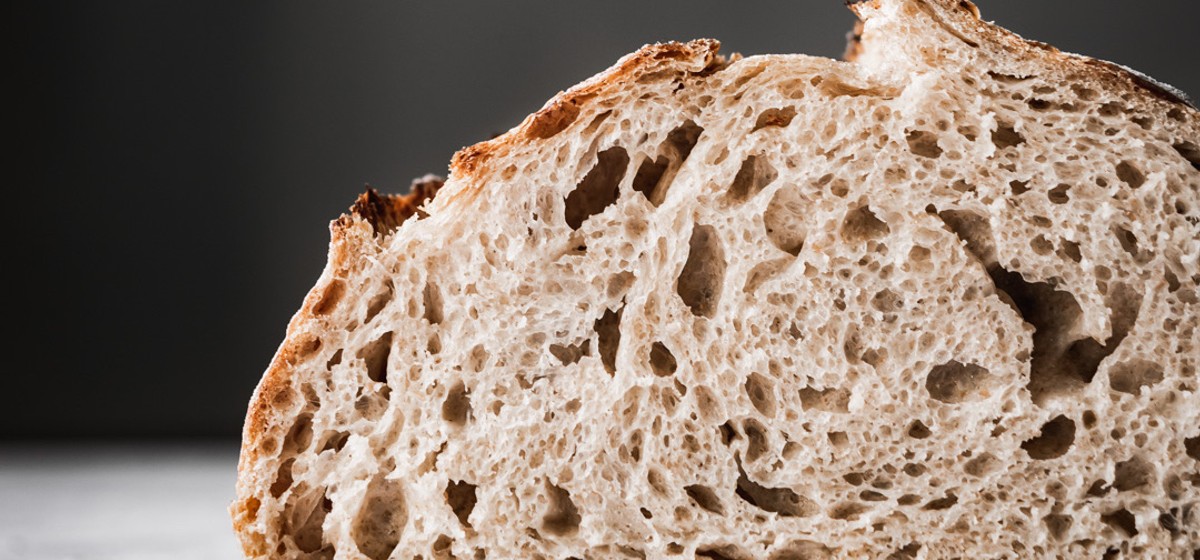
The specific blend of flours that I featured in this recipe make for what we consider to be a perfectly balanced loaf. The crust is not too thick but has that classic crispy shatter that we absolutely love. The crumb is open but not too open, meaning whatever you choose to spread on your slices won’t slip through big holes. If you want to experiment with different flour combinations to custom tailor your loaf here is a quick guide:
If you can source fresh-milled flour, I could not recommend it more highly. The differences between fresh-milled flour and industrial flour are vast. Namely, fresh-milled flour incorporates the entire grain kernel (germ, bran, and endosperm) which makes for flour that has maintained all the nutrition and flavor of the whole grain. Industrial flour cannot contain the entire grain kernel because it is produced to be shelf-stable and would go rancid too quickly if it contained the germ specifically. Unfortunately, the germ is where the most nutritious elements of the grain come from, so flours devoid of the germ are essentially devoid of nutrition.